
WATER SAMPLING
Many different containers can be used to collect samples for analysis. The simplest is a small, clean bucket or jar attached to a rope or pole. More sophisticated devices can be used to take samples from the bottom of bayous, creeks and ponds. Whichever container you choose, make sure it holds enough water for all the tests you want to conduct.
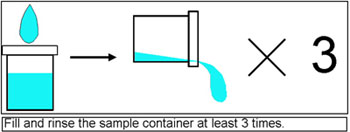 It is important that your sample not be contaminated with residue from other samples or the previous contents of the sample container. If you are using a container that was previously used for other purposes, you will need to clean it thoroughly with clean water before your sampling trip. Because of possible chemical contamination, you should avoid containers that were used to store oils, paints, or other nasties. Once at your sample site, rinse your container at least three times with water from the sample site. This removes any residue from previous samples, dust, etc.
To collect your sample, simply submerge your sampling container to the desired depth. With open topped samplers such as buckets and jars, you will only be able to collect samples near the water surface. You will need a specially-designed sampler to collect bottom-water samples. In many cases, you will want to collect water away from the edge of the bayou due to shallow depth, obstructions on shore, etc. To do so, collect samples at the end of a long pole (such as a PVC pipe) or toss your bucket towards the middle of the bayou (remember to tie a rope to the bucket and hold on!!).
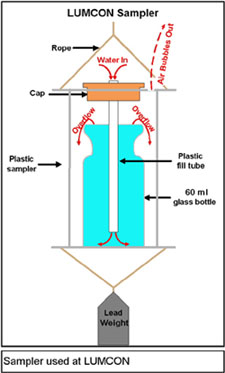
When sampling at LUMCON, we use a specially-designed sampler from LaMotte, Inc. that collects bottom water samples and automagically rinses the sample bottle five times before the sample is collected. To use this sampler, simply insert the 60 ml glass bottle and place the orange cap on the sampler, ensuring that the plastic fill tube is inserted into the bottle. When the sampler is lowered into the bayou, water enters the fill tube and begins filling the glass bottle. As the bottle fills, air is pushed out through the vent hole at the top of the sampler. Because the volume of the sampler is five times greater than that of the bottle, the bottle overflows and is rinsed while the sampler continues to fill. When the bubbling stops, the entire sampler is full of water and can be retrieved.
|
Important steps to remember:
|